Saturday, June 6, 2015

Pink Princess Pajama Party

My sweetest Tiny Princess turned 3!  My how the time has flown by!

And she loves all things princessy!  There isn't one she doesn't love!  So, I decided to throw her a princess party but I was looking for one that wasn't too hard to do because I'm a classic procrastinator (Can I get an amen?!).  And, it absolutely HAD to be pink.

There were a few things that were mandatory for this party to go off without a hitch:
  • It had to be cheap.
  • It had to be able to put together fast.
  • It had to utilize things I already had.
  • It had to have an easy cake.
  • It had to have a pink princess.  A REAL, LIVE, HUMAN pink princess.
"Easy" and "Princess Party" don't usually go hand-in-hand, but I was determined to make it happen!


Hence came the "Pink Princess Pajama Party"!  I scoured Pinterest to find all things pink and princessy and slumber partyish and here is what I came up with:

Let's start with the birthday girl's outfit.  She had to have PJ's, of course!  And, Aurora (Sleeping Beauty) is the only pink princess, which is perfect since it was a pajama party!  My girlfriend had an Aurora applique and, as a gift for the tiny princess, she made her shirt!  I found a super easy tutorial online on how to make ruffled pajama pants and I threw them together in a jiff.  Well, maybe not quite as fast as I would have like, but oh well!  The fabric came from Joann Fabric and I had to buy very little of it to make all of it work.  Score on the cheap factor!


 Next, I had promise a REAL, honest-to-goodness princess!  And, those gals don't come cheap these days!  To find someone within my budget, I put out on Facebook that I needed a blonde 16-year-old to be Aurora for me.  My friend offered her daughter for $40 and I was off to the costume store to buy a costume, that I later turned around and sold on Craigslist.  :)  And, she was AWESOME!  She did so many great things with the kids and staying perfectly in character the ENTIRE time!  She told all the little girls at the end of the party that she had to go meet Prince Charming at the ball!  They loved every bit of it!  It was precious!


Decor:  This was the most time consuming part of the whole deal.  I had found an amazing headboard creation on Pinterest from someone who had designed a Night Owl party and had to recreate it using foam core.  So I bought four of the biggest sheets I could find and taped them together to make the width of my dining room table.  I used a pencil, Sharpie, and an Exacto knife to get the headboard and the pillows from the same sheets of foamcore.

I used a plastic table cloth that I had cut into strips as the bedskirt, and a printed plastic tablecloth as the bedspread.   The tissue poms were made from tissue paper.  The tule draped from the top is about 3 yards bought on sale at Hobby Lobby with one of the birthday girl's crowns around the bunching at the top.


The cake!  Since I waited until the last minute, I had to do a quicky cake!  So, since it was a pajama party, I ran over to Walmart and got 2 dozen donuts, stacked them on top of each other, and drizzed pink frosting (canned frosting with red food color) all over the top with sprinkles!  It was a huge hit and so cute!


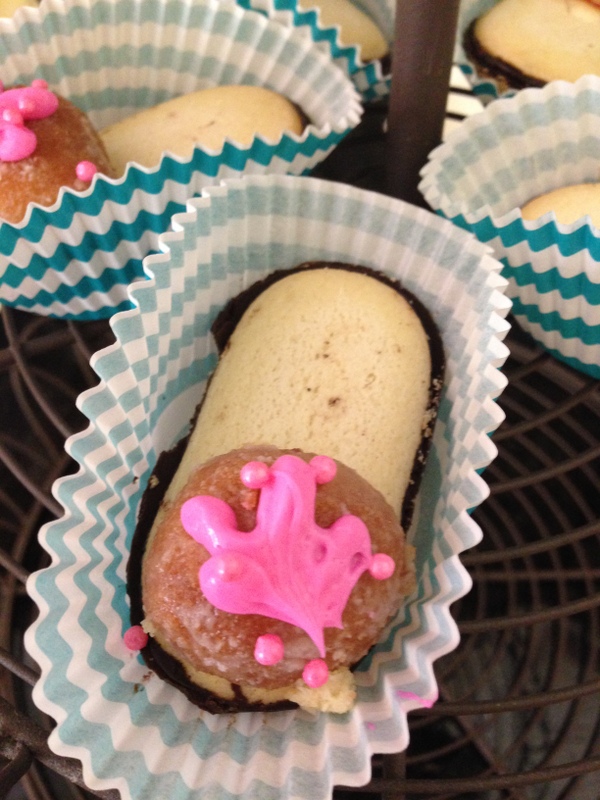
Extra treats were fun to make, too!  When I was a teacher, we would make slipper cookies for the moms for Mother's Day.  I had grandiose plans to cover my slipper cookies in tinted coconut, just as the years past, but that just didn't happen.  Instead I used the left over pink icing to draw little crowns on the cookies and used left over pink Valentine's Day sprinkles for the top.  To make these, I took Vienna Cookies and glued half a donut hole on to it with icing.  That's it.  Really.  I'm not kidding!


Other party details:  
At Walmart in the party section, I had found these super cute straws with lips and all the little girls could have kissy drinks!  How prissy is that?!  


One thing the little girls did was have a dress-up party!  What is a princess party without dress up clothes?!


And Princess Aurora also painted the toenails of our little princesses with pretty colors and glitter!


Unfortunately, I didn't take a picture of the "Thank you for coming!" gifts!  I hate I forgot because sometimes that the hardest thing to come up with!  But, just so you know, I had bought pink plastic bowls with straws like these from Walmart.  I had put a small box of cereal inside it and tied a bow around it.  Then, I tucked a little pink spoon in the bow. That was it!  It was perfect!


The bowls looked a lot like these but without the names and the tags.  You can find the actual picture here:  http://catchmyparty.com/photos/961020
That was it! It was such a good time and my little princess had so much fun that she is still talking about it!  I'm not sure  how we are going to trump it for the next one! 

Mommy sure does love her Tiny Princess!!!


Friday, June 5, 2015

Easy Money Gift!

When I was a kid, my mother was always so insistent on making sure we beautifully wrapped every gift we gave.  It wasn't until about 10 years ago that a gift bag ever graced her home!  Ever gift was wrapped in a perfectly sized box, with gorgeous wrapping paper, and a floofy (Is that a word?) bow.  I remember sitting with her on the floor of her bedroom before Christmas wrapping presents that all matched each other and the recipient just perfectly!

It's a good thing she instilled this in me because I love to give cash gifts to people as gifts! I don't know what it is, but I love to give (and get!) money as presents to people!  I know that typically cash isn't a very personal gift, but when it's presented with love, it takes it to a whole new level!  Here recently, I gave Monkey's kindergarten teacher a cash gift that was so adorable! You can click the link to find out how I made it.


As for my Tiny Princess, I found a fun and easy way to give her preschool teacher a cash gift as well!  It wasn't as much money, but still a ton of fun to open!  


I gave each of her preschool teachers $10 in ones.  You're right.  It isn't much.  And it isn't fun.  But when it's connected together end to end with an imbedded message, it's a blast!

Here's how I did it.

First I went to Walmart and got $10 in ones.  My initial intent was to tape them end-to-end, but then I decided to imbed a sweet message within the ones.  The message had to be 10 words, one in between each $1 and one at the end.  My message was "I love you and am blessed by you. {heart} 'Princess"'.

Next, I found a box that was wide enough to fit the whole sh-bang inside.  Lucky for me, my husband gave me a anniversary band a few weeks before (Whoop whoop!) and still had the box.  


I cut squares from construction paper that were the same width as the bills and a smaller one to inset on the first paper.  I wrote one word on each of the squares as seen below.  You can see the strip of packing tape behind the word.  It was about 4 inches long and connected each bill to the top and bottom of each word.


Once all the bills and words were connected, I ended up with a long strip that needed to fit and connect to a tiny box.  (In hindsight, I would have gone with a bigger box.)  I wanted all the bills to come out of the box entirely, so I connected the bottom $10 do a longer plain strip of paper and taped IT to the bottom of the box.  I also did the same with the lid of the box so that when they opened it, it would come cascading out.  


Once the construction was finished, I wrapped in beautiful wrapping paper and a big floofy bow, just like Mom.  :)


Adorable {and Easy!} Graduation Card Idea

"My baby is graduating from {insert grade here} and I need a great gift idea!"

I thought the same thing when my son graduated from kindergarten this year and I immediately jumped on Pinterest.  Shocker, I know...

I stumbled across these adorable graduation cards!  As a teacher, I always loved to give cash as a gift because I could use it wherever, whenever, however I wanted to!  But, because I wasn't able to give $100, I wanted the packaging to be ultra special.


The lady who made these is super talented with paper and probably scrapbooking, both of which I could never really get in to.  So, I had to come up with a new and simplified version of this card because it was soooo perfect!  Not to mention, you can't always use cash to show the year!  Now was definitely the time!  And, as most of you know, I don't plan ahead for anything so I had to make it work asap!

Here's my quickie version:


Here's the process:

1.  Take an 8.5x11 sheet of cardstock of your favorite patter and cut it in half long-way.  Why those dimensions?  Because it's easy. You could do whatever dimensions you want.  When picking a paper pattern, consider how it's going to look as a border.  Don't pick a huge print because you will only see little bits of it going around the white paper.


2.  Fold the top corner over to meet the side.  Remember how you used to do this when you passed notes in class?  Yep, do it just like that!  Then open it back up and do the opposite corner to the other side.  You should end up with folds that make an X.


3.  Fold the top of the paper over so that the fold is on the center of the X.  Open it up.  You should have an * shape from all the folds.  Keep in  mind it is all on one side of the paper... namely, the top.


4.  Now focus right here.  The next thing you will do is stick your finger in the halfway fold and pull it toward you.  Do that on both sides.  You can see from the shadowing below how that fold where my finger is is popped up.


Once both sides are popped up, the card will naturally fold where the current folds are and make a triangle at the top.  


5.  Smoosh that folded section down really well to lock those folds in.  You want them to be clean and crisp.  Sometimes I use the back of a spoon to press really hard.  Once that's done, fold the bottom of the card up almost to meet the bottom of the triangle.  I'd say you leave about 1/4" of space between the two.  And, again, press that fold down really well.


6.  Use a little white glue on each side of the paper below fold to make the pocket.  Key here is  A LITTLE.  White glue has a lot of water in it and will buckle paper if you use too much.  Dot, dot, not a lot!  :)  Set your cell phone on top of it while it dries.  Well, you can use anything.  I just had my cell phone handy!


7.  Next I cut the white paper for the message part of the card.  I didn't take pictures of this but I used white cardstock and cut a size that would fit on the pocket area of the card but still leave a cute amount of border.  I'm pretty sure it was something weird like 3.75 x 4.25 or something like that. It was trial-and-error for me so don't freak out if it is for you.  And, again, I used a very tiny amount of glue to get it on there, popped the cell phone down on it again, and let it do its thing.

8. Next I cut the cardstock for the graduation hat.  I don't have pictures of that process, but what I did was find a size that would cover the triangle part of the cardstock without covering too much of the white sheet I was going to put on the bottom.  I think it was 5" x 5".  I glued it to the triangle part of the card base with what ended up being too much glue, so only use a tiny bit.  I know I sound like a broken record, but it's super important!

9.  Now for the tassel.  I used embroidery floss that I had stowed away somewhere and wound it around my hand lots of times, as if I were making a pompom, but not quite so many!


10.  I then took a piece of embroidery floss (about 5 inches long) and tucked it in by the base of my hand to make the string that holds the tassel onto the hat.  I knotted it and then cut off the little piece of extra string that was left over, being sure I left enough to connect it to the button in the center of the "hat".


Then I tied a little piece of the floss around the entire tassel below the first knot to create the graduation tassel look.  (See below.) Then I cut the length of the tassely dangly things to the length I wanted.


10.  After the tassel is made, hot glue it to the center of the side of the hat.  Then glue the string to the center of the hat. Cut the excess string.  Glue a button to the center of the hat.  {Public Service Announcement:  If you keep forgetting to pick up the glue gun from the library of the elementary school as did I, you can use a lighter and an extra glue stick to glue things on.  It IS INDEED inefficient, but great in a pinch.}


11.  Now that the hat is officially done, open the card up to see how it all is laid out.  I noticed that I didn't like the raw edge of the white triangular part and the blue hat, so I wanted to add a scrap of cardstock.  I cut it to fit that little square space made by those two triangle shapes and glued it in with a little glue.  You can see it in the final picture.  It's the red square on the diagonal at the top interior of the card.


12.  I closed the card once again and wrote "Class of '27" around the edge of the hat and had my son write is name in the extra white space above "Class of '27" once the card was open.


13.  Add the cash!  Here's the best part!  Tuck a $20, a $1, and a $5 in the pocket, folded so you can see it.  Now, in the picture I used a $10 but I went back in and changed that because it didn't make semantic sense.  I replaced it with a $1 so it read better.  (Sorry Ms. Anderson and Ms. Hoover.  You  got shafted.)


And, that's it!  Really  not hard and doesn't require any fancy scrapbooking tools or even to go shopping!   I used everything I had stored in my craft cabinet!  

Thanks to the fine lady that came up with this adorable idea!  The teachers LOVED it!

What was the most useful gift/ cute gift wrapping you have ever received?